 DIYGATHER YOUR SUPPLIES
1. Image to transfer. Use anything you like. I made up my canister labels in Photoshop. I wanted them to be a bit different and quite typographic so decided to style them based on dictionary definitions (my artwork is attached as a free printable if you would like to use them – see the ‘At a Glance’ section at the end of the post to view and download!).
2. Inkjet printer.
3. Decal paper (blue watermark on back). Decal paper comes in clear or white. I’m using the clear paper because I want a transparent background around my image.
4. Magic paper (attached translucent protective paper).
5. Laminator. Basic laminators can be bought for around $20 from most office supply and department stores.
6. Scissors.
7. Water.
8. Soft cloth.
9. Item to embellish. As already mentioned, I’m using my plain SLOM jars from IKEA.
10. Microwave, oven or hairdryer.
THE PROCESS
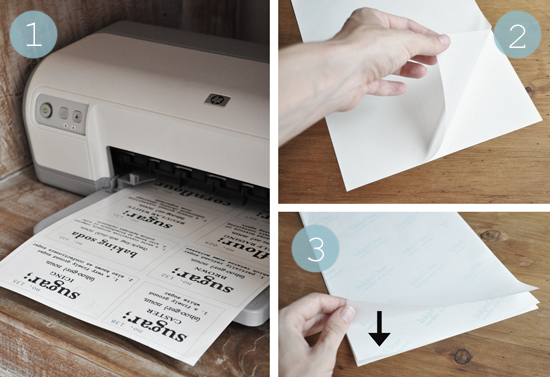
1. Print your image onto the glossy side of your decal paper (DO NOT mirror your image) using an inkjet printer. Allow to dry thoroughly. I created my canister labels in Photoshop and have attached them below as a free printable (see the ‘At a Glance’ section at the end of the post to view and download!).
2. Separate the translucent protective paper from the magic paper. Do not throw the translucent paper away.
3. Place the magic paper gloss side up on your table. Lay the decal paper printed side down on top of the magic paper. Place the translucent protective paper gloss side down on top of the decal paper (the translucent paper is designed to act as a protective barrier of sorts between the decal paper and laminator heat).
Note: As my image took up the entire sheet of decal paper I did not need to trim around it first. If you are working with a smaller image you may wish to cut roughly around it with scissors.
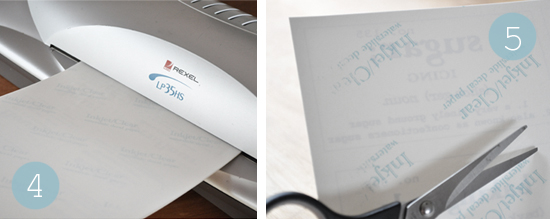
4. Laminate your stack of three papers together on low speed and at low temperature.
Note: Laminating pouches are not needed. Laminating is performed to fuse the decal paper and magic coating together. Basic laminators can be bought for around $20 from most office supply and department stores.
5. Discard the translucent paper. Your decal paper and magic paper should now be fused together. Trim closely around your image – you can see it quite easily through the paper if you hold it up to the light.
Note: By nature, waterslide decals have a very fine, slightly translucent carrier film. On close inspection this will be visible on completed transfers. As my image is text alone with no border I experimented with techniques and found the neatest finish to be a nice even box (trying to mimic the outline of the text just looked messy). If your image has a distinct border then trim approximately 2mm all the way around it (leaving a small buffer ensures you get a good seal).
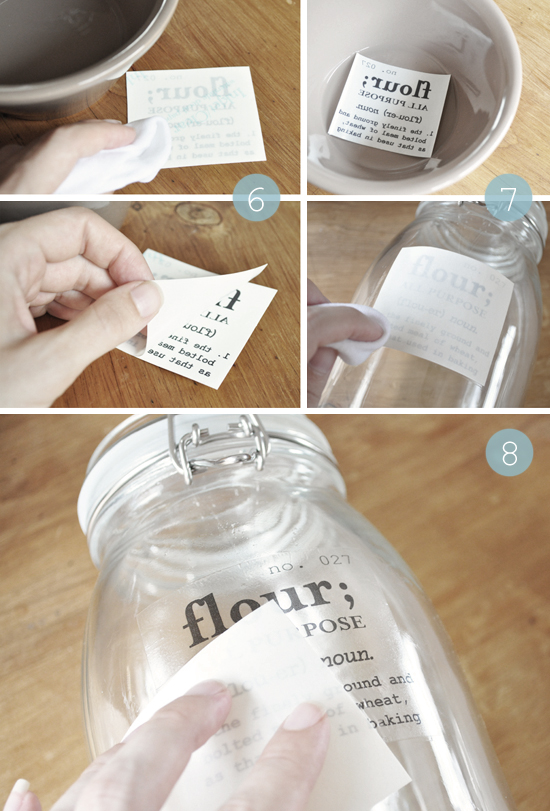
6. Dampen the back of the decal paper (watermarked side) with a cloth until it becomes translucent. Wait around 15 seconds then gently peel the paper away completely.
Important: Ensure you remove the watermarked decal paper only at this stage.
7. Quickly immerse the decal in a shallow dish of water to dampen the other side then position it, image side down, on your item, smoothing it down with your fingers and a slightly damp cloth to remove excess water.
8. Carefully slide off the backing paper and manipulate the decal into its exact position then continue to smooth it until it is water and air bubble free.
9. Finally, set the decal by either:
Baking in an electric oven for 8 minutes at 150 degrees celsius.
Cooking in a microwave for 5 minutes on low.
Blowing with a hairdryer for 5 – 10 minutes.

Although I was hesitant, I did find the courage to run these babies through the dishwasher (twice, just to be certain) and they didn’t show any signs of distress. I was honestly AMAZED! Of course, given I have only had them for a few days I can hardly vouch for their longevity so advise hand washing for frequent use.https://thepaintedhive.net/2012/02/magic-decal-transfer-tutorial-with-free-printables/